
This article clears up How to Disassemble Xbox One Controller assuming it needs fixes, remembering expected catches and concentrated tools you’ll require. Xbox One controllers are for the most part acknowledged as one of the best computer game controllers around How to Disassemble Xbox One Controller, however they actually separate occasionally.
How to Disassemble Xbox One Controller
Think about dealing with a plate to keep screws or different parts from falling on the floor or getting lost.
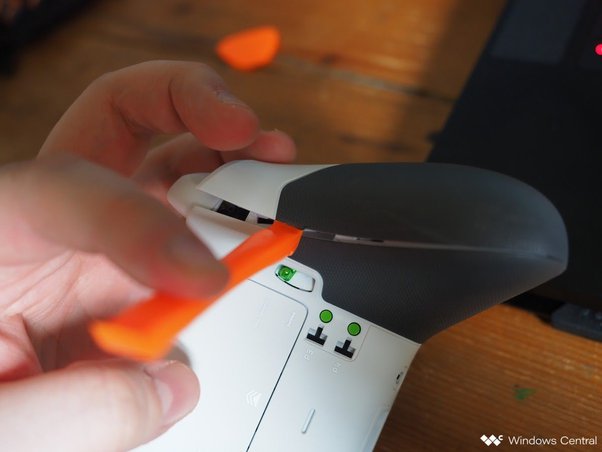
Take the orange pry tool from your tool unit.
Slide the pry tool between the plastic crease on the grasps as shown.
Switch the grasp away from the primary controller body How to Disassemble Xbox One Controller. Note that there is additionally cement holding it set up under the plastic, so don’t fear applying some power.
Rehash this for the two holds.
Then, we’ll eliminate the screws. When the screws are eliminated, your Xbox controller will fall to pieces like a sandwich. Be incredibly cautious since, supposing that you pull it separated too hard, you might harm the link that associates the battery to the hardware.
Four Reasons to Take Apart a Xbox One Controller
Your Xbox One controller gets a great deal of activity. Accordingly Lines of Code, it should be consistently kept up with. Past infrequently cleaning the buttons off How to Disassemble Xbox One Controller, you presumably don’t do this.
However, upkeep to guarantee long haul execution from the controller requires you really want to know how to securely dismantle the Xbox One controller. This may be to:
- Fix or supplant a thumbstick
- Fix or supplant a button or trigger
- Really take a look at battery associations
- Clean any soil that has aggregated around the controls
What You Will Need to Disassemble Your Xbox One Controller
It isn’t generally so natural as airing out an old radio to Open a Xbox One controller. You can’t utilize standard screwdrivers to get inside a Xbox One controller. All things considered How to Disassemble Xbox One Controller, you’ll require a Torx screwdriver- – – and that is not all:
- Torx screwdriver (T8 or T9, contingent upon controller model)
- Flathead screwdriver
- Plastic prying tools (guitar plectrum/pick is a decent substitute)
- Plastic spudger or expendable blade
Dismantling
Before you can dismantle your controller, you really want to know what tools you’ll require. You will require a Phillips head screwdriver, spudger, and wire cutters.
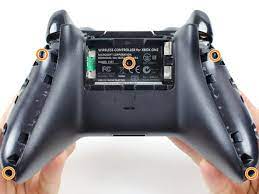
In the first place, eliminate the battery pack from the back with the wire cutters. Take out the screws on the left half of the gadget with the Philips head screwdriver. Take out every one of them.
Then, with your spudger or flathead screwdriver, pop off the clasps on top of one or the other side of the controller by sliding in the middle between where they are stuck to the body of the controller How to Disassemble Xbox One Controller. Then utilize your Phillips head screwdriver to eliminate every one of the screws that are under them with their comparing cuts.
How would you eliminate a Torx T8 without an exceptional screwdriver?
In the event that you don’t have a Torx T8 screwdriver, you can utilize a standard screwdriver in the event that you’re cautious. In the first place, find the score on the top of the screwdriver that relates to the size of the Torx bit. Then, at that point, hold the screwdriver so the score is agreed with the space on the top of the Torx bit. At last, turn the screwdriver counterclockwise to eliminate the screw.
Steps To Take Apart Your Xbox One Controller
Before you start the interaction, guarantee you’ve separated all links from the controller and taken out the batteries from the battery compartment How to Disassemble Xbox One Controller. Put your Xbox One controller on a level surface with more than adequate space, in a perfect world a sufficiently estimated table.