
With The Witch Queen DLC, Bungie has pressed a ton of new privileged insights in their activity MMO Destiny 2. One of these privileged insights is Darkness Rift locations. These rifts are attached to a victory called No Peeking. To begin unlocking these rifts, you should initially finish the whole Witch Queen crusade. This will open the journey steps important to get the Parasite extraordinary projectile launcher expected for finding and closing the rifts. Follow our aide on obtaining this weapon in the event that you don’t have it at present. There are ten darkness rift destiny 2, and this guide will show you where to chase them down.
All Darkness Rift Locations in Destiny 2
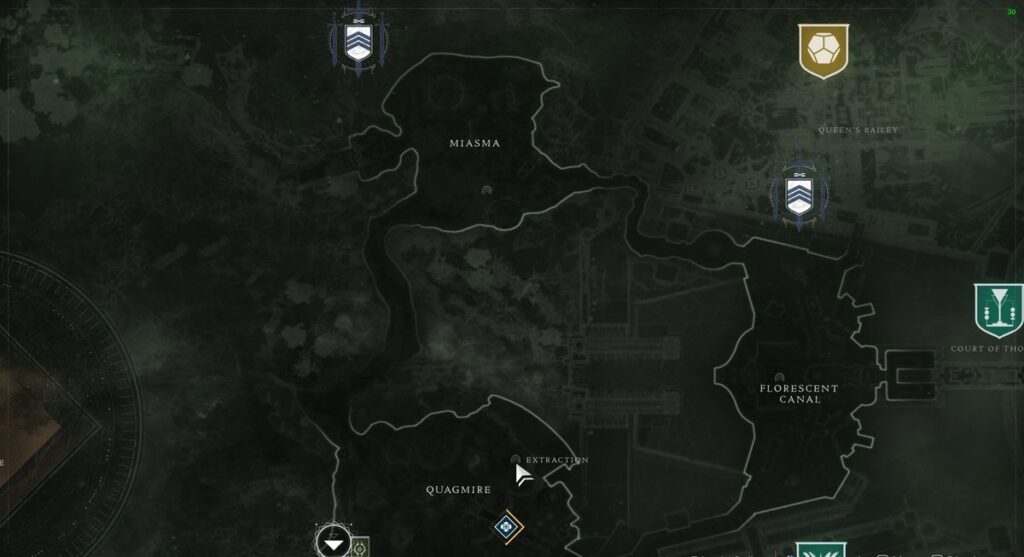
Darkness Rift 1 – Quagmire
Go towards the Florescent Canal entrance from the Quagmire and take a right at the door. Promptly in front of you, you’ll see a small construction. Head inside, and you’ll see the Apex Darkness Rift locations above you close to the rooftop.
Darkness Rift 2 – Fluorescent Canal
Head into the Fluorescent Canal from the Quagmire entry and ride up the main street. Before you cross by the middle flight of stairs, take a right and you’ll see three towers hanging over the precipice. The focal tower has a darkness rift taken cover behind it, stroll around the side of the tower and you’ll have the option to shoot it no issue.
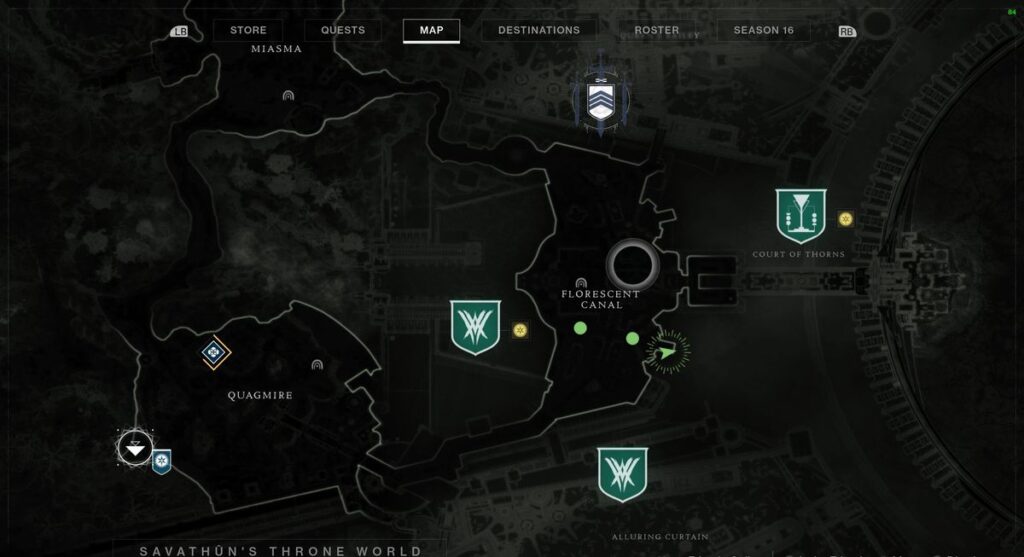
Darkness Rift 3 – Court of Thorns
While you can take shots up at this Darkness Rift locations from the open world, we suggest jumping into a Wellspring movement and destroying this rift there. You can find it on the most noteworthy stage overlooking the extension in the Court of Thorns. In the Wellspring Activity, focus on the dark support point close to the monster drop part of the way through the action. On top of the right support point (while looking out over the extension from on top), you’ll find the rift.
Darkness Rift 4 – Sepulcher Lost Sector
This Darkness Rift can be observed right alongside the chest toward the finish of the Sepulcher lost area. Basically battle your direction through the foes present, and look left of the chest once you arrive at the end. You’ll find the rift toward the side of the room.
Darkness Rift 5 – Queen’s Bailey
Go to the Queen’s Bailey from the entry in the north east corner of the Fluorescent Canal. Travel straight ahead past the growth, then, at that point, take a left onto the raised stage by means of the steps. Floating in the sky here will be your next Darkness Rift locations.
Darkness Rift 6 – Miasma
Ride into the miasma and go to the sanctuary entrance on the south west piece of the area. When you enter the enormous yard, stroll around the right side until you find yourself next to a huge 3D square design. There, hovering over the ground you’ll find the Darkness Rift.
Darkness Rift 7 – Metamorphosis
Head inside the Metamorphosis lost area in the Miasma. When you arrive at the end, there will be a daily existence that will return you to the entry. As you ride this lift, you’ll ignore a Darkness Rift locations which you’ll need to shoot while flying. Assuming you miss it, you’ll either need to run Power Cycle all the way back to the furthest limit of the lost area, or parkour your way back up through the opening in the rooftop to get another opportunity.
Darkness Rift 8 – Extraction
Go to the furthest limit of the Extraction Lost Sector in the Quagmire zone. When you arrive at the chest, pivot and look towards the room straightforwardly before you. Over the door jamb will be your next Darkness Rift.
Darkness Rift 9 – Temple of the Cunning
This one requires a great deal of running. Travel all the way down into the Temple of the Cunning from the Quagmire until you arrive at the monster span leading into the actual sanctuary. Once on the scaffold, continue advances until you arrive at the huge rough development to one side of the extension. Head onto these stones, and you’ll find the Darkness Rift up on a higher stage over a deepsight point. On the off chance that you’re having inconvenience reaching it, you can take shots at it from the light close by.
Darkness Rift 10 – Altar of Reflection
Head into the Altar of Reflection movement. When you arrive at the end, walk left of the special stepped area where you take a gander at recollections, and point off the side of the stage. You’ll see the final darkness rift floating between two support points. That closes our aide on all the darkness rift locations. Assuming you’re still in an exploratory mind-set, look at our aide on all the moth locations in Destiny 2. On the other hand, you can likewise look at our new news piece on all the equilibrium changes that is coming to The Witch Queen in week two and then some.
Between all of the Enemy Factions in Destiny and Destiny 2, What Faction Would Win and Why?
You would trust the Vex, yet the time travel part of them offers that they’re not going to wind up in an incredible spot later on. The future Vex are literally decaying husks contrasted with the before and current (comparative with the storyline) models. That shows that they’re either during the time spent being annihilated, or genuinely ruined at that point; yet because of admittance to time travel are delaying the inevitable.
What do you Think the Future Plots of Destiny 2 DLC and Destiny 3 Will Be?
They need to accomplish something with the Hive, since all of their best DLCs have been hive based. The fallen are kind of poo, the vex are Overplayed, and no one approaches the Cabal in a serious way. The Hive are dim and Mysterious, and are tomfoolery and cool to battle. The mission on Phobos in Destiny 1 expresses that there are likely more than one Dreadnought, and looking at this logically, they have been hinting at things(In Destiny two) for some time.